TWO-STROKE MOTOR
CYCLE ENGINES
HOW TO GET THE BEST
RESULTS FROM THEM
INSTRUCTIONS
for the good running and maintenance of Villiers
Two-stroke Engines and their Components.
LUBRICATION
Correct Lubrication of an Engine is
of the utmost importance.
The useful life and the amount of good service your Villiers Engine will give, depends almost
entirely upon the way it is lubricated, especially during the early stages of its life.
The modern Villiers Engine is as reliable as engineering skill can make it, and the only constant
attention which the owner is asked to give it, is to keep a plentiful supply of oil, and to see that the correct quantity is given to the engine at all times.
PATENT CASTROL XL OIL, obtainable at all first class garages, has been found to give good results in Villiers Engines, and as it is advisable always to use one particular brand of oil and not to change from one to another, Villiers owners are advised to adopt this brand regularly.
Petroil Lubrication.
On the 147 c.c. Engine and on some other Villiers Engines, petroil lubrication is employed. This is a very simple method in which oil is mixed with the petrol in proportion of half a pint to the gallon, which is, one part of oil to 16 parts of petrol. It is advisable to mix this well before pouring into the tank, so that the two will not separate out. The rider is relieved of all further attention until it is necessary again to fill the fuel tank, when the requisite proportion of oil must be added.
Automatic Lubrication.
On many present-day Villiers Engine the patented Automatic System is employed. This Automatic System has been designed to overcome the disadvantages of the mechanical oil pump, and the hand operated Drip Feed System. A mechanical pump delivers oil only in proportion to the engine speed, and a hand pump depends entirely upon the human element, whereas actually oil should be fed to an engine in proportion to its load, and be entirely independent of human forgetfulness. In the Villiers Automatic System, variations in the crankcase pressure are utilised to supply oil direct to each bearing. As the pressure in the crankcase varies according to the throttle opening, it will be realised that the more the throttle is opened, and consequently the heavier the load on the engine, the greater is the oil supply. Reference to the
accompanying diagram, together with the following description makes the oil circulation of this
System quite clear.
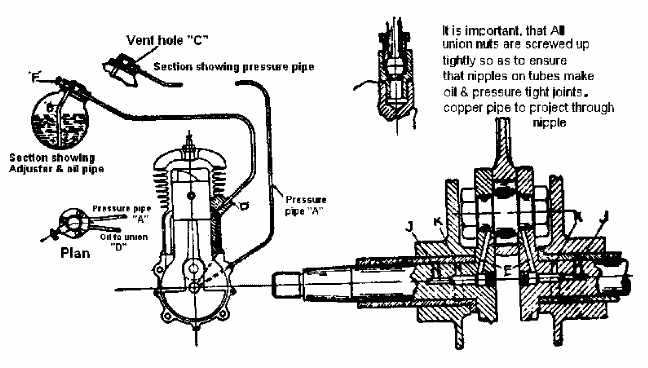 Compressed air from the crankcase passes along the centre of the shafts to the holes " J," which register with grooves in the crankcase bushes when the piston is descending. The air passes on through holes drilled in the crankcase to a union situated in front of the crankcase. From this point it is conveyed through the pressure pipe "A" to the top of the oil tank, raising the pressure in this, and Forcing oil up the pipe "B" in the same way as
soda water is forced up the centre tube of a soda syphon. The oil passes the regulating screw "F," and issues into the cup of the sight feed except in the Mark III Lubricator where it passes straight to the engine. From this the oil descends to the engine through a union "D" on the front of the cylinder except in certain Models where it passes straight to the crankcaae. Here the oil divides, part of it being sucked through a hole in the cylinder wall uncovered by the piston, and the rest passing down to the crankcase, where it is again divided between the two main bearings.
Grooves in these register with ports "K" in the crankshafts when the piston is ascending, and the surplus oil is sucked through the drilled oilway "E" to the big end. When the engine stops, the pressure in the tank is released via the main bearings of the engine, but oil would continue to syphon out of the tank into the engine if provision were not made for this. The vent hole "C" prevents this, as, by permitting air to pass into the sight feed cup from the tank, it enables the oil in the pipe "D" to drain down to the engine without sucking further oil up pipe "B." There is a continuous flow of air through vent "C," while the engine is running, and this passes down to the engine with the oil, keeping the sight feed cup clear. It is of the utmost importance that the size of the vent hole should not be altered.
Compressed air from the crankcase passes along the centre of the shafts to the holes " J," which register with grooves in the crankcase bushes when the piston is descending. The air passes on through holes drilled in the crankcase to a union situated in front of the crankcase. From this point it is conveyed through the pressure pipe "A" to the top of the oil tank, raising the pressure in this, and Forcing oil up the pipe "B" in the same way as
soda water is forced up the centre tube of a soda syphon. The oil passes the regulating screw "F," and issues into the cup of the sight feed except in the Mark III Lubricator where it passes straight to the engine. From this the oil descends to the engine through a union "D" on the front of the cylinder except in certain Models where it passes straight to the crankcaae. Here the oil divides, part of it being sucked through a hole in the cylinder wall uncovered by the piston, and the rest passing down to the crankcase, where it is again divided between the two main bearings.
Grooves in these register with ports "K" in the crankshafts when the piston is ascending, and the surplus oil is sucked through the drilled oilway "E" to the big end. When the engine stops, the pressure in the tank is released via the main bearings of the engine, but oil would continue to syphon out of the tank into the engine if provision were not made for this. The vent hole "C" prevents this, as, by permitting air to pass into the sight feed cup from the tank, it enables the oil in the pipe "D" to drain down to the engine without sucking further oil up pipe "B." There is a continuous flow of air through vent "C," while the engine is running, and this passes down to the engine with the oil, keeping the sight feed cup clear. It is of the utmost importance that the size of the vent hole should not be altered.
Three types of Villiers Lubricators are made:-
	Mark  I.        For use when the oil tank is itself a
                     		 compartment of  the main  fuel  tank.

	Mark   II.      For   fitting in  separate   oil  tank.

	Mark  III.      Where no sight feed is  required.
Their difference is merely a matter of arrangement,and their principle is precisely the same. In the Mark II and III Lubricators the vent hole is larger in diameter, and there should be a small piece of wire loose in this hole. Its object is to keep the hole quite clear and prevent an oil film choking it.
Running Instructions for the Villiers
Automatic Lubricator.
All the unions, both at the lubricator and engine ends of the oil pipes, are of the solderless type; each nipple has a taper at either end, and there is a corresponding internal cone on the unions and nuts. When the nuts are screwed up they squeeze in the nipples, making them grip on the pipes. It is important to keep these unions always tight. If they are taken apart, it may be necessary to fit new conical nipples when replacing to ensure, getting a good joint again.
From the description above it will be seen that the system works on pressure, and therefore it is
important that this be always maintained in the tank, consequently the unions must be tight, and
there should be no air leak from the oil compartment. Special attention should be paid to screwing the filler cap down firmly and making quite sure that it seats on its leather washer. There must be no vent hole in the filler cap. A common cause of pressure leakage is due to enamel on the threads of the filler cap collar, preventing the cap from screwing down fully. A similar trouble can arise from the washer being creased. It should always lie quite flat. The average pressure in the tank is about 4 Ibs. per square inch, and the maximum
is only 6 Ibs., but this pressure must be maintained.
Failure to comply with this will result in over-oiling at low speeds and shortage of oil at speeds over 25-30 m.p.h.
Should the lubricator continue to deliver oil after the engine has stopped, this is due to syphonic action caused by the vent hole being choked. The vent hole, which is very small, should be cleaned with a single strand of Bowden wire. If the sight feed bowl fills with oil, this is due to an air leak under the sight feed glass.
The vent hole in the Mark I Lubricator is in the sight feed bowl itself. In the Mark II it is as shewn in the diagram, whilst in the Mark III Lubricator the vent hole is in the annular groove under the top washer.
It is important that all washers are kept in good condition as any leakage will interfere with the correct working of the lubricating system.
Setting the Oil Supply.
The flow of oil varies automatically according to the engine load and throttle opening. The adjusting screw "F" is usually set when the motor cycle is sent out to supply rather more oil than is normally required. After running about 400 miles, this should be screwed in slightly to reduce the oil supply. The correct setting has been obtained when a faint blue haze of smoke issues from the exhaust pipe, as the machine is running normally in top gear on a level road. The sight feed is provided to ascertain if oil is flowing, and not to gauge the quantity. In very cold weather it is advisable to increase this setting.
Running In a New Engine.
Whilst an engine is new, great care thould be taken to prevent its abuse, and during the first 400 or 500 miles it should never be driven at a speed exceeding 30 m.p.h., and for this period an extra supply of oil should be given, either by mixing an additional quantity with the petrol for the petroil system of lubrication, or with the Automatic Lubrication System, by opening the regulating screw a little more than usual. When the engine is new, do not let it scream round in a low gear, but at the same time do not remain in top gear long enough to cause the engine to labour and snatch at the transmission. It is advisable to keep the carburetter mixture adjustment a little on the "rich" side, rather than too weak.
NOTES ON DECARBONISING
Decarbonising a Two-stroke Engine is quite straight-forward, because of the simplicity of this type of unit. The following points, however, are worth special attention in connection with Villiers Units.
When removing and replacing the cylinder, care should be taken not to twist it round the piston— it should be pulled off or pushed on straight so that the rings cannot catch in any of the ports and break.
All carbon should be removed from inside the piston head, as well as from the top of the piston and from the cylinder head. The ports in the cylinder—particularly the exhaust port, should receive careful attention, and should be kept clean, but on no account must the size or shape of these ports be altered by filing.
Piston ring grooves must be kept free from carbon in order to leave the rings quite free. Piston rings should be bright round their surface which
makes contact with the cylinder bore. Should wear cause the piston ring gap to exceed 1/32 in.
when in the cylinder, the piston ring should be replaced.
Carbon will form on the gudgeon pin at either side of the small end bush, and this should be carefully removed, otherwise difficulty will be experienced in removing the pin from the piston. The small end bush and the piston bosses should be kept quite free from carbon.
No washer or gasket is used between the cylinder barrel and head on Villiers Engines with detachable Cylinder heads. A perfect, gas-tight joint is made by screwing down the four cylinder head bolts tightly. and by giving them a final tighten when the engine has cooled down after its first run. It is not necessary to put any jointing compound or shellac betwcen the cylinder and head.
It is of the utmost importance that Silencers and Exhaust Pipes are kept quite clean internally, and that a heavy deposit of carbon is not allowed to accumulate. This would cause back pressure and loss of power.
EXHAUST PIPES & SILENCERS.
Attention to these parts is probably the most important of all, and many strange disappearances of power in a two-stroke engine are attributable to these components. A thick coating of soot will form inside the exhaust pipes, which must be thoroughly cleaned, and the same attention should be paid to the expansion chamber. It is impossible to give details of the procedure to he adopted in every case. because most machines have a different type of silencer, according to the manufacturer's own design, but it must be taken as a general rule that these must be clear and free from back pressure.
If a silencer is employed with internal baffle plates having small holes drilled In them. the carbon will tend to form on the edges of these holes and close them in. resulting in time in only a very small aperture through which the gases may escape. This must he corrected. If the silencer has a filling, as in some cases, Of a bundle of metal turnings, the soot will adhere to this in a remarkable manner, and it is almost impossible to remove. in such cases, it is advisable to replace with a new filling, or omit altogether, but in the latter case the engine may be too noisy.
A flue brush is a very useful thing for removing soot from long exhaust pipes. In an old machine to which probably no attention has been paid for a long time to the exhaust pipe, the carbon may be very hard to remove, and the only way to treat it is to get the pipe or silencer hot in a fire and then tap on the outside to loosen the carbon. This will, of course, destroy any enamel or, plating on the outside, but it is certainly worth while, from the point of view of the increased efficiency obtained. The silencer can always be re-enarnelled afterwards.
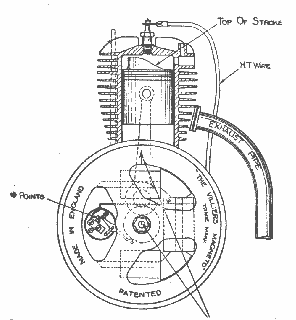
THE VILLIERS FLYWHEEL MAGNETO.
On all Villiers Engines the Magneto, as its name implies, is built into the flywheel, which is an arrangement greatly simplifying the construction of the engine, and helping to lessen the weight of the complete machine.
Dismantling.
Removing the cover will expose the flywheel to view, and the latter may be removed by undoing the centre nut. This nut has a flange which draws the flywheel from the shaft, as it is unscrewed, and this obviates the use of a special extracting tool, and also prevents any damage which might be done to the flywheel if it had to be levered from the shaft. As this nut is necessarily very tight, it is advisable not to use an adjustable spanner, the jaws of which are apt to open and damage the corners of the hexagon.
The Villiers Engineering Company supply a special forging, known as the "Hammer-Tight" Spanner, and the price is 3/6.
This nut, which has a right-hand thread, is unscrewed in an anti-clockwise direction, looking at the face of the flywheel. The spanner should be placed on the nut and hammered round in that direction. After about two turns it will be found to tighten. This is because the flange is now pulling against the face of the flywheel. If a piece of wood is now placed against the face of the nut and hit sharply with a hammer it will loosen the flywheel
on the taper of the shaft and the nut can be unscrewed with the fingers till the flywheel is
completely removed. When taken off, a piece of iron, such as a spanner, should be placed across
the pole shoes, to prevent loss of magnetic flux. The various components of the armature
plate are then readily accessible. It should be noted here too, that the contact breaker points are quite accessible without removing the flywheel which should never be taken off unless something more serious requires attention, or it is necessary to remove the complete magneto for any reason.
The Armature Plate.
On early models this is held in position by means of a split steel bush, which is contracted on to the main engine shaft bush, and a screw in the boss at the back of the armature plate regulates the tension of this bush.
In the case of magnetos with variable ignition, the screw should be adjusted by means of a long handled screwdriver until just sufficient tension is obtained to allow the armature plate to be removed round by hand, but it should not be sufficiently loose to move by itself. Slackening the screw right off will enable the armature plate to be drawn completely from the engine, but in the case of the fixed ignition magneto, there is a strap connecting the armature plate to one of the crankcase bolts, and this must be removed before the armature
plate can be taken off.
On some later models and on certain industrial engines the armature plate is rigidly fixed to the crankcase by means of two screws, the heads of which are inside the magneto. With this type of fixing it is not of course, possible to employ variable ignition. The armature plate is removed after undoing the two screws.
Re-fitting and Timing the Flywheel
Magneto.
First of all replace the armature plate, and in the case of the fixed ignition type, position it by means of the strap referred to overleaf. Before fitting the flywheel, wipe the taper of the engine shaft and the corresponding taper inside the cam of the flywheel perfectly clean and dry. Then place the flywheel in position and screw up the centre nut. Before the latter is quite tight, set the flywheel so that the arrow stamped on its face is in line
with, and on the same side of the centre as, the small mark on the end of the engine shaft.
Hold the flywheel in this position and then tighten the centre nut, locking it firmly in position by a few sharp blows on the end of the "Hammer-Tight" spanner. If this is done accurately, the timing will automatically be correct, because the two marks are so arranged to make the breaking of the contact points coincide with the suitable position of the piston.
 TIMING MARKS TO COlNCIDE AS SHOWN ON TOP SIDE
Where variable ignition is provided, for general running the lever on the armature plate should be pulled back to the " advance " position. When this lever is vertical the ignition is fully retarded. (See paragraph (e) page 29).
Adjusting the Contact Points.
The accurate adjustment of these points is of importance for the efficient running of the engine, Adjustment is only occasionally called for, but this setting will often make all the difference between poor results and a good performance. Two spanners are desirable - one to hold each of the nuts on the adjustable point.
First of all, the flywheel should be turned round so that the rocker arm is lifted to its highest position on the cam. Then the lock nut (bottom one) should be loosened and the other nut turned until the faces of contact points are exactly 1/64 in,apart. The screwed point should be carefully held in this position while the lock nut is then tightened
securely. For accurate setting there is a gauge fitted on the contact breaker spanner supplied by
the Villiers Engineering Company, at the price of 3d. each. The contact point gap should be set to the thickness of this gauge. If the points are set too close, it will result in difficult starting. If the points make almost continual contact, starting will be almost impossible or spasmodic back-firing in the silencer will occur. It is wise to keep the contact points quite clean, and they should occasionally be wiped with a petrol soaked rag to remove any dust or Foreign matter which may collect. Do not ever file the contact points.
Retarded Ignition.
Often obscure engine troubles may be traced to a loose armature plate which may cause the adjustment of the points to vary, and may result also in the ignition automatically retarding itself. Such an occurrence will make the engine run hot and in an erratic manner. The remedy is to tighten the armature plate securely.
Ignition troubles are rare; if, for instance, difficulty is experienced in starting the engine, investigations should first be made to ascertain that the engine is receiving a supply of petrol. Press the "tickler" on the carburetter, and if petrol flows, that may be taken as correct. Then suspect the sparking plug; unscrew it from the cylinder and lay it on the top fins with the high tension cable connected to it in the usual way, but do not let the cable terminal touch the cylinder. Then rotate the engine with the kick starter or by turning round the flywheel. If no sparking is noticeable between the sparking plug points, it will show that the plug is the cause of your difficulty. It should be dismantled and carefully cleaned, all soot being removed from its insulation, because this is probably causing the current to short circuit instead of jumping the points and creating a spark Re-assemble the sparking plug and carefully adjust the points so that a distance of not more than .025 in. separates them. resuming that when tested there is a satisfactory spark at the plug points, and the engine still refuses to fire, examine the high tension cable from the magneto to the sparking plug. This may have been touching the cylinder, with the result that the rubber covering has burned, and the inner wire was touching a metal part of the machine, thus causing a short circuit. The only satisfactory remedy then is to fit a new cable. Another point at which trouble may occur, but this is very unusual, is at the "pick-up" spring inside the magneto. At the magneto end of the high tension cable is a vulcanite terminal. This terminal should be taken out, and it will be seen to contain a small spring which makes contact with the ignition coil. This spring should be quite straight, so that when the terminal is in position, its pad touches the small contact point on the coil, immediately underneath it. Should the spring show signs of having been bent sideways, it has probably not made proper contact, and your trouble lies there.
Another possible cause of difficult starting is the formation through oxidisation of a film on the contact point of the ignition coil, and this can be scraped clean with a pen-knife.
Types of Magnetos.
There are various types and patterns of Villiers flywheel magnetos, but the foregoing particulars apply to all in general and it will serve no useful purpose to give a description of the construction of each pattern.
A Final Word about Sparking Plugs
The manufacturers, who carry out extensive and prolonged tests, really do know the type of sparking plug best suited to each particular engine, and therefore, if occasion arises to fit a new sparking plug; it should always be of the same make and type as the original one. It is often a costly matter to experiment with different sparking plugs, because a very cheap one can quite easily do considerable damage, although this is not appreciated by many users.
Insist on having genuine Villiers
spare parts only for your engine—
for satisfactory results.
Back to BIKES page